WordPress on PHP-FPM & Caddy in Docker
WordPress is one of the most popular content management systems (CMS) in the world, and for good reason. With its easy-to-use interface, customizable themes, and extensive plugin library, WordPress is the go-to platform for individuals and businesses looking to create a stunning website. It’s free, user-friendly, and versatile, allowing users to create a website for just about anything. Whether it’s a blog, an online store, or a portfolio, WordPress has got you covered. Plus, with its regular updates and strong community support, you can rest assured that your website will be secure and up-to-date. Overall, WordPress is awesome because it provides an accessible platform for anyone to create a beautiful and functional website without having to be an expert in web development.
The part that matters to most of us is how easy is it to install. well if you follow this tutorial it is *very easy*.
Install Docker
You can even run this in docker rootless!
Create a Docker Compose File
Create a new directory for your WordPress project and create a docker-compose.yml file inside it. Paste the following code into the file:
version: '3'
services:
  wordpress_caddy:
    image: caddy:alpine
    container_name: wordpress_caddy
    ports:
      - 80:80
      - 443:443
    depends_on:
      - wordpress_phpfpm
    volumes:
      - ./wordpress:/var/www/html
      - ./caddy_data:/data
      - ./caddy_config:/config
      - ./Caddyfile:/etc/caddy/Caddyfile
    networks:
      - net

  wordpress_db:
    image: mariadb:10
    container_name: wordpress_db
    volumes:
      - ./db:/var/lib/mysql
    environment:
      MYSQL_ROOT_PASSWORD: wordpress_r_p
      MYSQL_DATABASE: wordpress
      MYSQL_USER: wordpress
      MYSQL_PASSWORD: wordpress
    restart: unless-stopped
    networks:
      - net

  wordpress_phpfpm:
    image: wordpress:fpm
    #image: ghcr.io/kingpin/php-docker:8.1-fpm-alpine
    container_name: wordpress_phpfpm
    environment:
      WORDPRESS_DB_HOST: wordpress_db
      WORDPRESS_DB_USER: wordpress
      WORDPRESS_DB_PASSWORD: wordpress
      WORDPRESS_DB_NAME: wordpress
    restart: unless-stopped
    depends_on:
      - wordpress_db
    volumes:
      - ./wordpress:/var/www/html
      - ./php_override.ini:/usr/local/etc/php/conf.d/uploads.ini
    networks:
      - net

networks:
  net:
Create a caddy Configuration File
create a new file called Caddyfile and copy these values in there.
example.com {
        root * /var/www/html
        php_fastcgi wordpress:9000
        file_server
}
Make sure to edit example.com on line 1 to your domain or subdomain.
Create a php_override.ini file
Create a new file and call it php_override.ini, and put the following text in there. This lets you edit file upload size, and script execution times. needed for larger files.
file_uploads = On
memory_limit = 500M
upload_max_filesize = 100M
post_max_size = 100M
max_execution_time = 600
max_file_uploads = 50000
max_execution_time = 5000
max_input_time = 5000
max_input_vars = 5000
Start docker containers
docker compose up -dAccess your site
Once the containers are up and running, you can access WordPress by opening a web browser and navigating to http://example.com (replacing example.com with the domain you picked. This will lead you to a setup page where you initially pick your language.

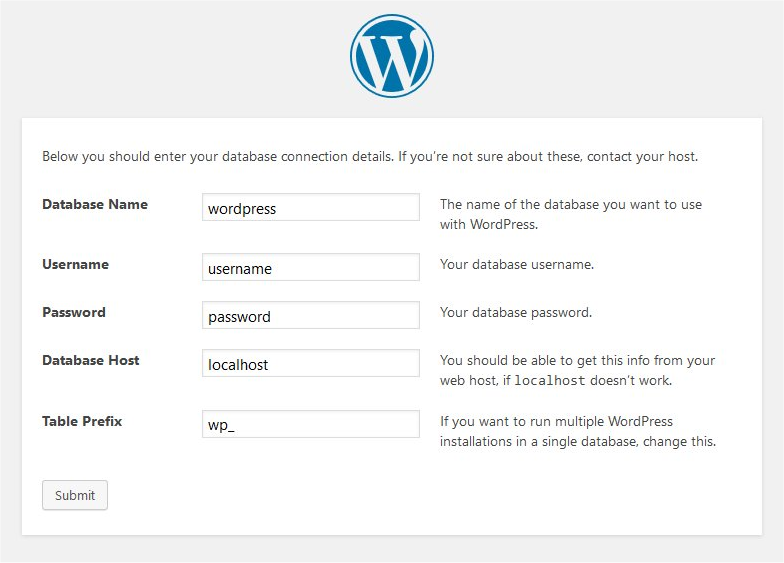
Along the way, it *should* pick your DB info from the env variable we defined. if not you will enter your DB info with the following if you didnt edit it in the docker-compose.yml above.
- Database host: wordpress_db
- User: wordpress
- Password: wordpress
- Database Name: wordpress_db
- Table Prefix: whatever you want it to be, you can leave it default of wp_
This should get you up and running!
You can reference https://wordpress.org/documentation/article/how-to-install-wordpress/ if you need more help.