How to securely deploy Cloudflare Tunnels
In the current digital landscape, securely exposing local applications to the internet is one of the paramount challenges for developers and system administrators. This is where Cloudflare Tunnels, formerly known as Argo Tunnel, steps in. This service bypasses traditional methods that often involve complex VPN setups or risky exposure of local ports to the world. Whether you’re a seasoned developer or an IT enthusiast dabbling in web technologies, understanding how to leverage Cloudflare Tunnels is crucial.
What is Cloudflare Tunnel?
Cloudflare Tunnel allows you to expose your web services and applications to the internet securely, without opening inbound ports. Instead, it establishes an outbound connection (a “tunnel”) from your local environment to Cloudflare’s edge network. This setup not only ensures your applications are secure by default (since your local network is never exposed directly) but also integrates seamlessly with Cloudflare’s performance and security features.
Key Benefits of Cloudflare Tunnel
- Enhanced Security: By eliminating the need to configure inbound rules on firewalls, Cloudflare Tunnel minimizes potential attack vectors.
- Ease of Configuration: Deploy a local project to the production environment quickly without messing with complex network settings.
- Performance Edge: Leverage Cloudflare’s CDN functionalities for your local services, offering better performance to end users.
- End-to-end Encryption: Maintains high security for your data traffic, with encryption from the client to Cloudflare’s network, and back.
Installing and Using Cloudflare Tunnel
Prerequisites
- A Cloudflare account and a domain managed by Cloudflare.
- The local server or environment where your service is running.
- Basic familiarity with command-line operations.
Installation Steps
Step 1: Install the cloudflared Tool
First, you need to install the cloudflared daemon, which is responsible for creating and managing your tunnels. Installation instructions differ slightly depending on your operating system.
- Ubuntu / debian
curl -L --output cloudflared.deb https://github.com/cloudflare/cloudflared/releases/latest/download/cloudflared-linux-amd64.deb && sudo dpkg -i cloudflared.deb- Redhat / Fedora
curl -L --output cloudflared.rpm https://github.com/cloudflare/cloudflared/releases/latest/download/cloudflared-linux-x86_64.rpm && sudo yum localinstall -y cloudflared.rpm- macOS: Using Homebrew:
brew install cloudflared
- Windows:
Docker compose
services:
  cloudflared:
    image: cloudflare/cloudflared:latest
    container_name: cloudflared
    restart: unless-stopped
    command: tunnel run TUNNELNAME
    environment:
      - TUNNEL_TOKEN=aaaaabbbbccccddddd
    networks:
      - cloudflare

networks:
  cloudflare:
    external: true
Make sure to change TUNNEL_TOKEN above along with TUNNELNAME in the command. replace TUNNELNAME with the name you picked in #4 below
run the following command:
docker network create cloudflared
docker compose up -d && docker compose logs -f
using docker you can now simply add other containers to your Cloudflare network for them to be visible to Cloudflare tunnel. This enhances security since if a service or container isn’t in the Cloudflare network in docker it won’t be visible to Cloudflare. Add the below parts to your existing docker-compose.yml to add a service to Cloudflare network, this example below shows a caddy docker container being added to the Cloudflare network. lines 9-14 were added to this example.
services:
  caddy:
    image: caddy:latest
    container_name: caddy
    restart: unless-stopped
    ports:
      - "80:80"
      - "443:443"
    networks:
      - cloudflare

networks:
  cloudflare:
    external: true
Setup & Management
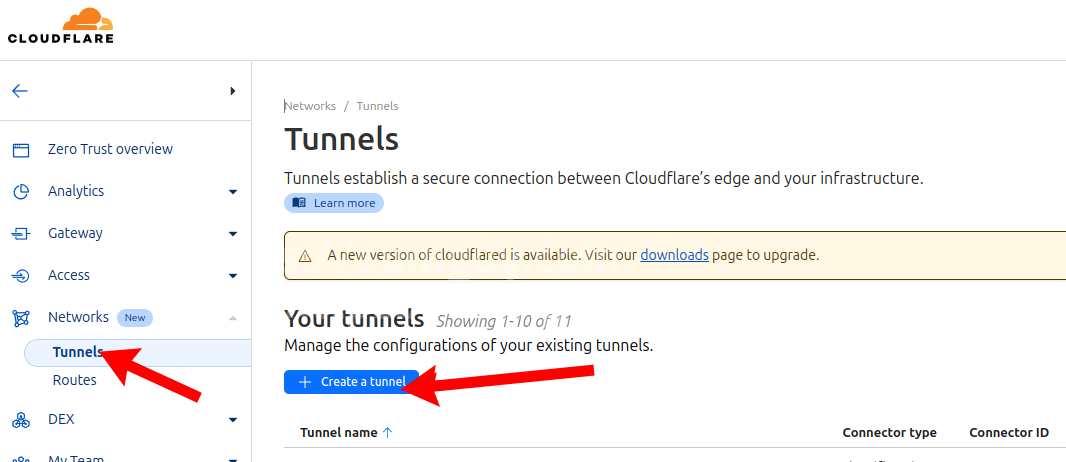
- Log in to Zero Trust and go to Networks > Tunnels.
- Click create a tunnel.

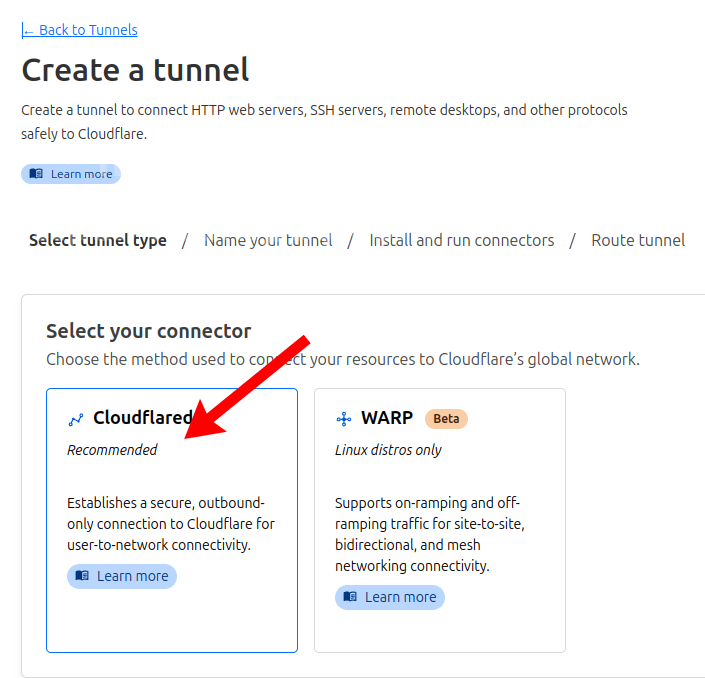
- Choose Cloudflared for the connector type and select Next.

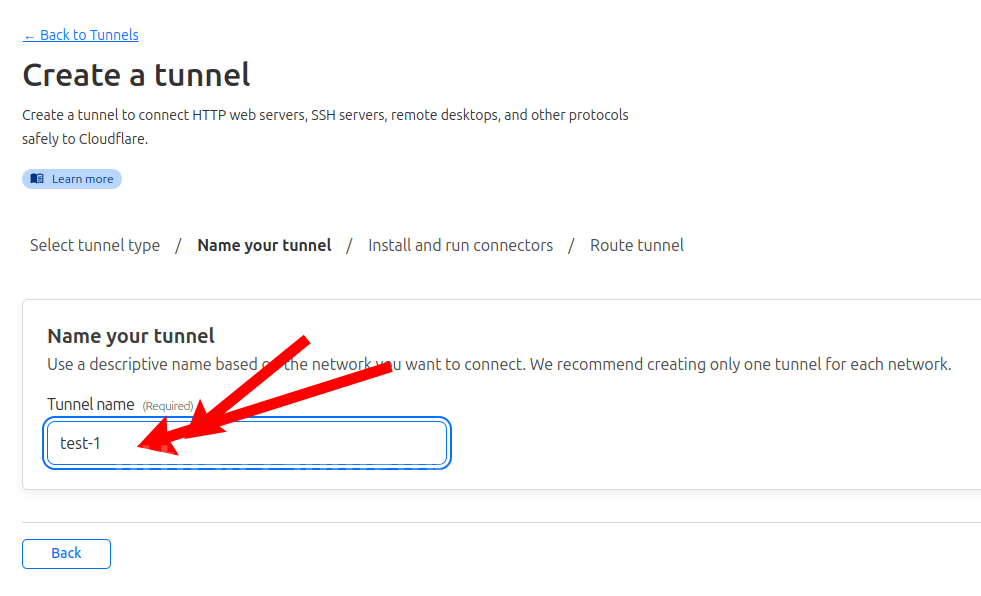
- Enter a name for your tunnel. We suggest choosing a name that reflects the type of resources you want to connect through this tunnel (for example, enterprise-VPC-01).

- Select Save tunnel.
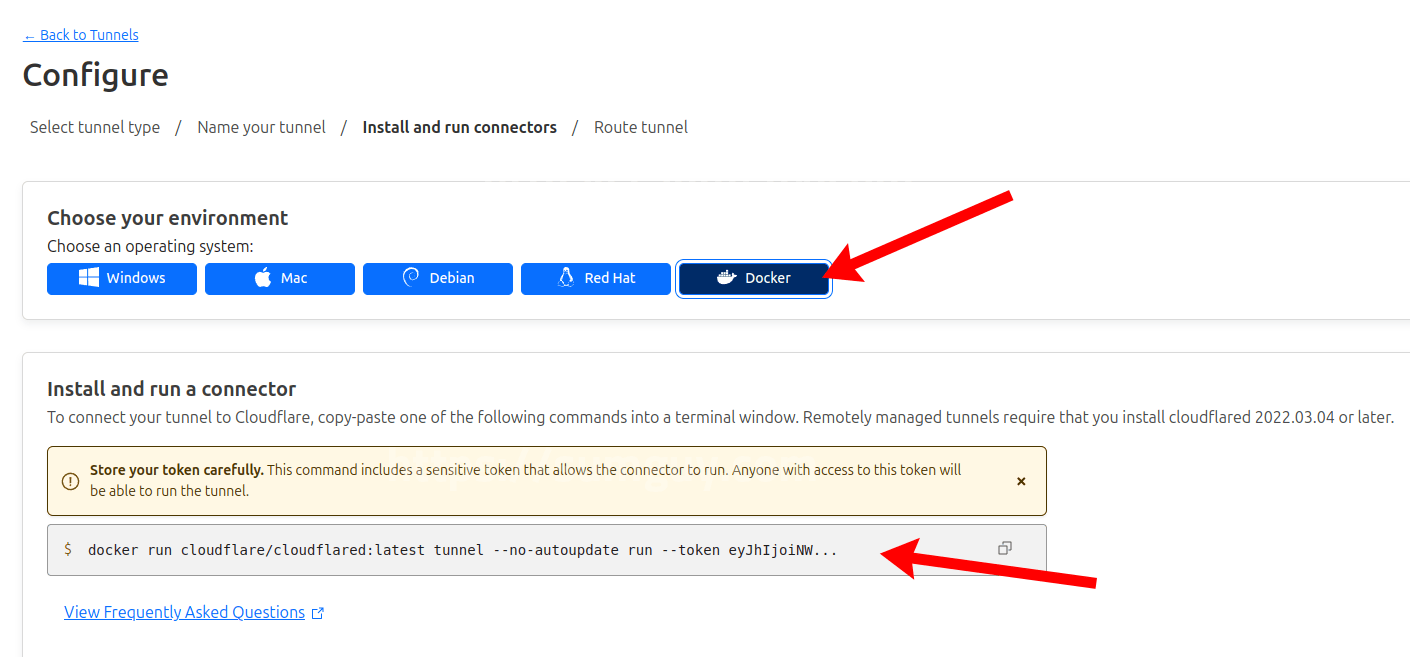
- Next, you will need to install cloudflared and run it. Refer to the installation section of this guy or follow the instructions on the Cloudflare page.

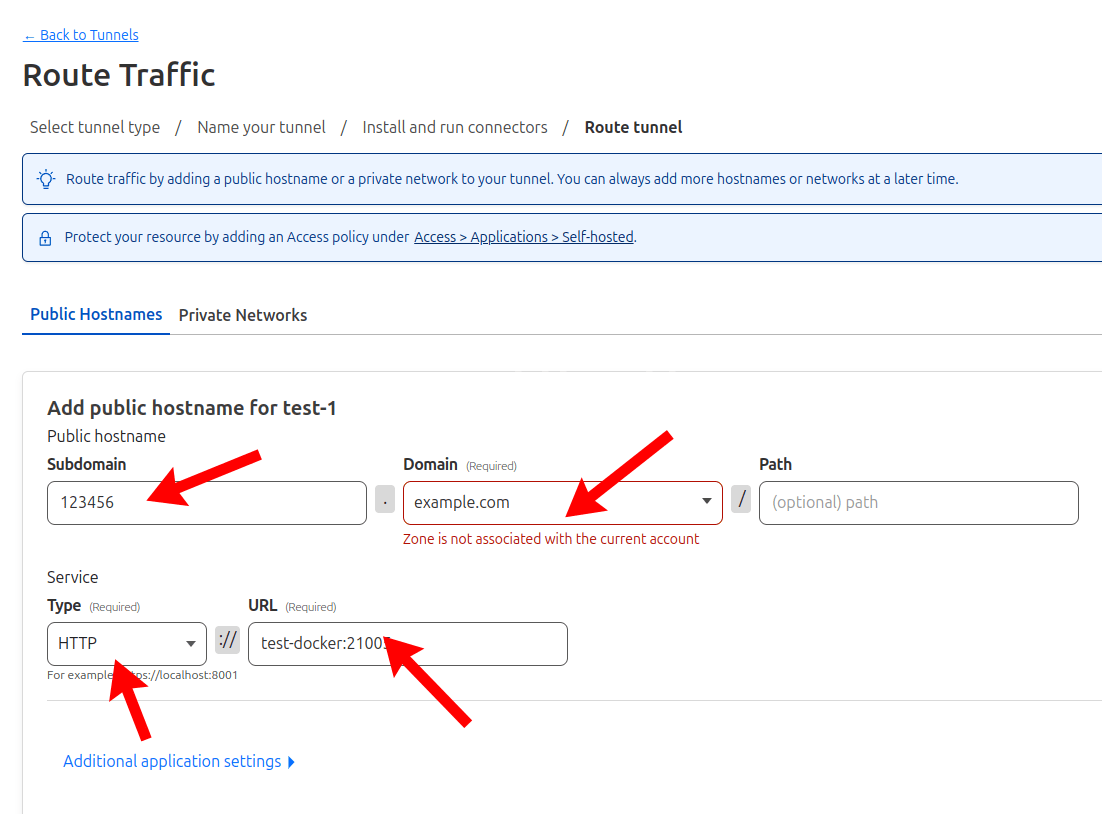
- Set up a domain or subdomain to be routed via cloudflared, e.g. for setting up a subdomain blog.example.com to goto a server hosted on IP 10.10.10.222 on port 21004 enter the following info

- enter a subdomain in box #, i.e. blog
- start entering the domain you want such as: example.com
- make sure to click the domain you want from the drop-down, just typing it doesn’t work, you need to click the domain from the dropdown.
- enter how the protocol to connect to such as
httpor https - enter the ip address or address and port of the server e.g. 10.10.10.222:21004
Launch
After installation, and setup is complete on the cloduflare panel, start cloudflared via following commands:
Linux & Mac:
sudo cloudflared service install <tunnel token>Windows:
cloudflared.exe service install <tunnel token>Practical Use Cases
- Exposing Local Development Servers: Ideal for showcasing development progress in real-time to clients or stakeholders without deploying to a staging environment.
- Remote Access to Home Services: Securely reach your home NAS, IoT devices, or media servers from anywhere without traditional VPNs.
Conclusion
Cloudflare Tunnel offers a potent combination of security, performance, and ease of use for exposing internet-facing services. By following the above guidelines, users can securely and efficiently expose any local web service, leveraging Cloudflare’s robust network capabilities. Whether for development, personal, or production environments, Cloudflare Tunnel is a versatile tool in the modern web developer’s toolkit.
Further Learning and Support
For more detailed configurations and troubleshooting, visit the Cloudflare documentation and community forums, which offer a wealth of information and community-driven support.


